


How to Remove Personal Info (Word)
By default, Microsoft Word saves the author's name with all documents that that author creates. Though with the MyLaw upload this is not necessary, Word does allow you to disable this feature for a particular document to ensure the anonymity of exams. Here's what to do.
PC Users—Word 2010
- Click the “File” tab, then “Info,” then “Check for Issues,” then “Inspect Document.”
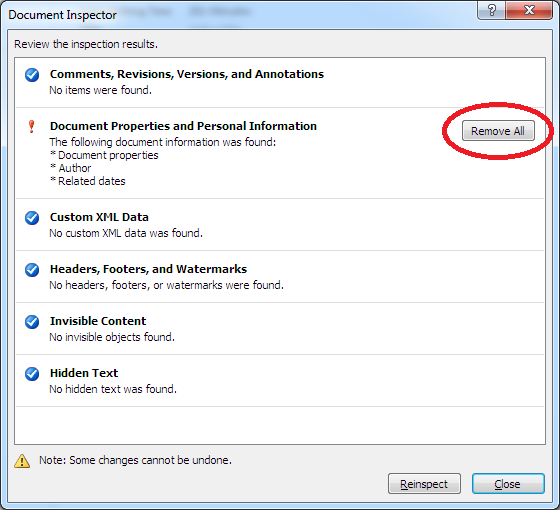
- When the Document Inspector dialog box opens, click the “Inspect” button at bottom right.
- Word examines the document, and then displays the results in a list. The second item in the list is “Document Properties and Personal Information.” To the right of “Document Properties and Personal Information” is a button labeled “Remove All.” Click that button. Next click “Close” then save your document.
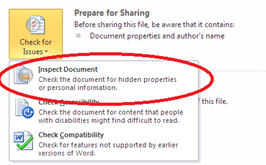
PC Users—Word 2007
- Click the Word 2007 Microsoft Office button.
- Place the mouse cursor over "Prepare" to reveal the "Prepare the Document for Distribution" menu. Click "Inspect Document."
- Click "Inspect." The Document Inspector will scan your file for personal information.
- Click "Remove All" if Document Inspector finds personal information in your file. Now click “Close” then save your document.
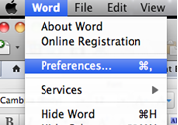
Mac users—Word 2011
- With the document open, select “Word” in the Word menu at the top of the screen and click “Preferences” in the drop down menu.
- From the “Word Preferences” dialog box, select “User Information” under the “Personal Settings” heading.

- Delete all the personal information that is displayed, click “OK”, then save your document.
At this time, law school IT does not know for sure if doing that will remove all possible identifying information from the document, but it will at least remove the author's name.